The blade is inspired by a couple of late nineteenth-century blades claiming to be somehow related to David Bowie. My design is a fusion that combines all of the “classic bits,” including a ricasso, clipped point, simple brass cross guard, flat ground blade, and a utilitarian handle. The main body of the blade is wrought iron from a historic grain elevator, erected in 1885, with modern 1070/1074 high carbon steel forge-welded on for a cutting edge. There is a hidden tag within the marblewood handle.

In early November 2021, on the last nice weekend we had, the bowie started as a round wrought iron bar roughly 1.5″ in diameter and about 9″ long. You can just see it poking out of my gloved hand in the photo below. From there, the forging commenced, first down to a square bar, and then drawn out to a rectangle so I could weld on the steel for the cutting edge.

Once the bar was drawn out, there was enough material to make two good-sized blades. I find that working on two blades at a time allows me longer heats, as while I’m working on one, the other is in the forge. Once the forge-welding process was complete, I focused only on the bowie, leaving the other blade as just a bar, to be finished later.
As part of the challenge, I set up a camera and filmed the process from start to finish. The forging session took about three and a half hours, from lighting the forge to cleaning up at end of the day. The video is a short set of heats that contain most of the main steps in the process. You can watch the shadows of the trees drift across the lawn for an approximate time scale.
Once the rough forging was complete, all of the blade’s profiles were in place: the tang, ricasso, profile and distal tapers, and the clipped tip. After a photo op, the last step of the day was to bring the knife back up to critical temperate and let it cool overnight in vermiculite to anneal everything.

I used few power tools on the project. The forge scale was removed with a 4.5″ angle grinder with a hard stone, and then I used a 1″x30″ belt sander to finish flattening the main bevel.

The next step in the process involved hand files, to finish the profile, to cut in the shoulders by the ricasso, and to refine the tip and false edge. Then I chose to draw file the blade to remove the grinder marks.

Heat treatment was an oil quench. With the dissimilar metals, I find it more reliable to use oil instead of water or brine. Then I put the blade through two tempering cycles in the oven. My goal was to produce a tough blade as opposed to a very hard edge, so if it’s even used as a fighting knife, there is less risk of a chipped or snapped blade. Post heat treatment and tempering, I like the look of the blackened ricasso and top edge as they contrast nicely with the brass guard and handle.

The false edge on the back of the clipped point is also highlighted by the black spine.

I didn’t think to take pictures of the process of making the handle, but everything was worked by hand. The marblewood handle was shaped with a drawknife and finished out with a carving knife. The beautiful grain was a nightmare, as it wanted to tear out and changed directions all over the place. I burned the tang into the handle and epoxied it for additional strength. I applied a simple polyurethane high-gloss finish to the handle. The cross guard is marine brass brought up to a high polish.

The last steps were to sharpen and clean up the surface of the blade. I like the look and the texture that draw filing leaves, and it pairs well with the rough grain of the wrought iron and shows the contrast to the steel on the edge.

A short video to demonstrate that it is sharp and can both slice and stab.
One of the things I had to learn during the challenge was how to take better knife pictures. Here are a few more shots showing different views:


Knife Measurements:
Total weight: 316.5g or 11.16oz.
Center of gravity: 1/4″ in front of the ricasso toward the tip.
Dimensions:
- 8.25″ from tip to ricasso.
- 9″ from tip to guard.
- 4.75″ guard to end of handle.
- 14″ tip to end of handle.
- 1.5″ widest point on the blade.
- 5/16″ thick at the ricasso.
- 3/16″ thick at the start of the clip where the false edge is
Documentary views of the blade:


A bit about me:
My main focus in blacksmithing is Anglo-Saxon smithing, roughly 600-800CE. I make a variety of items ranging from woodworking tools like chisels, plane blades, and blacksmithing tools such as hammers, chisels, and tongs, to more general goods like hinges, large rings, nails, and small every-day carry knives. Most of my tools are reproductions of historic finds. The hammer I used for most of the forging is wrought iron with no steel faces. The lighter hammer used for forge welding has steel faces and a wrought iron body. The hot cut chisel is also plain wrought iron, hence why I could cut on the main face of my anvil without worrying about damaging the anvil (the plan was to not cut all the way thru). The tongs I used are modern steel, but would be recognizable to a smith from just about any time period. I use a modern hammer for the spring fuller to minimize the damage to the face of the wrought iron hammer. The spring fuller, London pattern anvil, and propane forge are modern, or relatively so when compared to the 9th century.
To complete the challenge, there were a lot of things I needed to learn or apply for the first time:
- A blade longer than about 3″ or 4″
- A ricasso
- A cross guard
- A clipped tip
- Simple digital video editing
- Photographing a knife
I had a good time making the bowie knife. This was definitely a stretch from what I normally make, and I learned a lot. As with any project, there are things that I would do differently next time. Although there are things I’d like to improve upon, overall, I’m pleased with the final blade. It looks good and feels good in the hand.


First I went over the blades with a 4.5″ grinder with a hard wheel to get rid of the forge scale, then a flap disk.
After that it was time for the trusty 1×30″ grinder.
It felt a bit like cheating to grind the tip in further refine the bevels.
The top knife is the Bowie, and the bottom is a Seax that was forged the next day out of the second blank, not quite as large as the Bowie, but still not small.
With the grinding complete, I’ll be off to working with files to further refine the blades.

Most of the rough shaping of the blade was drawn out of the horn to make the process go a little faster.

Most bowie knives have a ricasso, I chose to put a hidden tang on mine. Recently I made a simple spring fuller, that helps a lot with getting the shoulders even. This is a task for a modern hammer as it would have marred up my wrought iron hammer.

By then end of the day the rough forging was complete, after this it would be thermal cycled and left over night to cool in a bucket of vermiculite to anneal to make it easier to work with.

Everything is put away back in the garage, the day is done.
I decided to enter “The Bowie Build Competition” from Sam Towns:
https://www.youtube.com/watch?v=euZ8fS-doGA
Make a knife, that has a “bowie shape” – The parameters are:
– Must have a guard or bolster
– Must have a clip/false edge (can be sharp or unsharpened depending on the legality in your given area)
– Must have a blade no less than 8″ (200mm) in length from tip to heel
– Must have a handle no less than 4 1/2″ (112.5mm) long
– Must be sharpened and able to cut
– Can be of any material
– Can have any handle construction
Otherwise make it your own, since I’m most comfortable with wrought iron body and a forge welded steel for the edge that is what I’m making. A thousand year old bowie knife. I setup a photo camera and a the phone to capture video.

The first picture is getting started, it was a nice day (likely one of the last ones in November). From there the first step was to shape the 1.5″ by about 8″ round bar stock that I started with into bar so that I could weld the steel on.

I generally work in a pairs of objects, both to give me a “back up” and it forces me to leave the iron in the forge longer so that I get better heats. In this case I made to welded up two blanks roughly the same size. One was slightly larger that is the one that will become the Bowie, the other will become a Saex.

Once steel was welded on the wrought iron, the process of drawing out to a longer and thinner rough shape. This process was done using my wrought iron hammer that I have been experimenting with. There is no steel face, just wrought iron, so far it seems to be holding up well. If you strike the anvil by accident, for example using the edge as a fuller, then a little file work is needed to take out the divot in the face. Other than welding I used this hammer almost exclusively on the project. When I used a spring fuller I did switch to a modern hammer because that would have left marks in the face of the hammer.

Of the a little more than three hours of forging video that I have most of it seems to be waiting for the metal to get hot again.
When my sister got her Laurel I made her a box to keep valuables in.
Purpose / Historical Context
Graves from the early anglo-saxon period contain goods buried along with their dead. There where a number of this style of wooden box buried in graves with woman, and one that was a child. This reproduction is a fusion of several different specific boxes.
Materials
Riven red oak harvested roughly 2013, finished with linseed oil. Split, worked with an axe, and then because of time constraints thickness planed with a power planer. Once near the correct thickness the final surfaces where all planed with a curved iron leaving the scallops in the surface. All joinery was done by hand, the box joints at the corners where laid out with dividers. The structure of the box comes from the joinery and the used of iron straps, no glue was used (except to fix a crack on the back of the box). The pieces of wood I had dictated the final size of the box, the grave finds where are a little larger than the reproduction by roughly 15%. The boxes from the find are common trees in England Adler and Beech, this box is made from locally harvest red oak from Minnesota.
Wrought iron hinges and straps are made from salvaged 1860’s wrought iron. The forge used is a modern propane forge done on a turn of the 19th century London pattern anvil, worked with a cross pein hammer. The thinner hardware (handle and clasps) was done in mild steel steel, attempts at thin wrought iron shapes did not go well. The nails and forge welded clasps and hand handle mountings where all made at the anvil. The nails and latches are all clenched over to lock them in place.
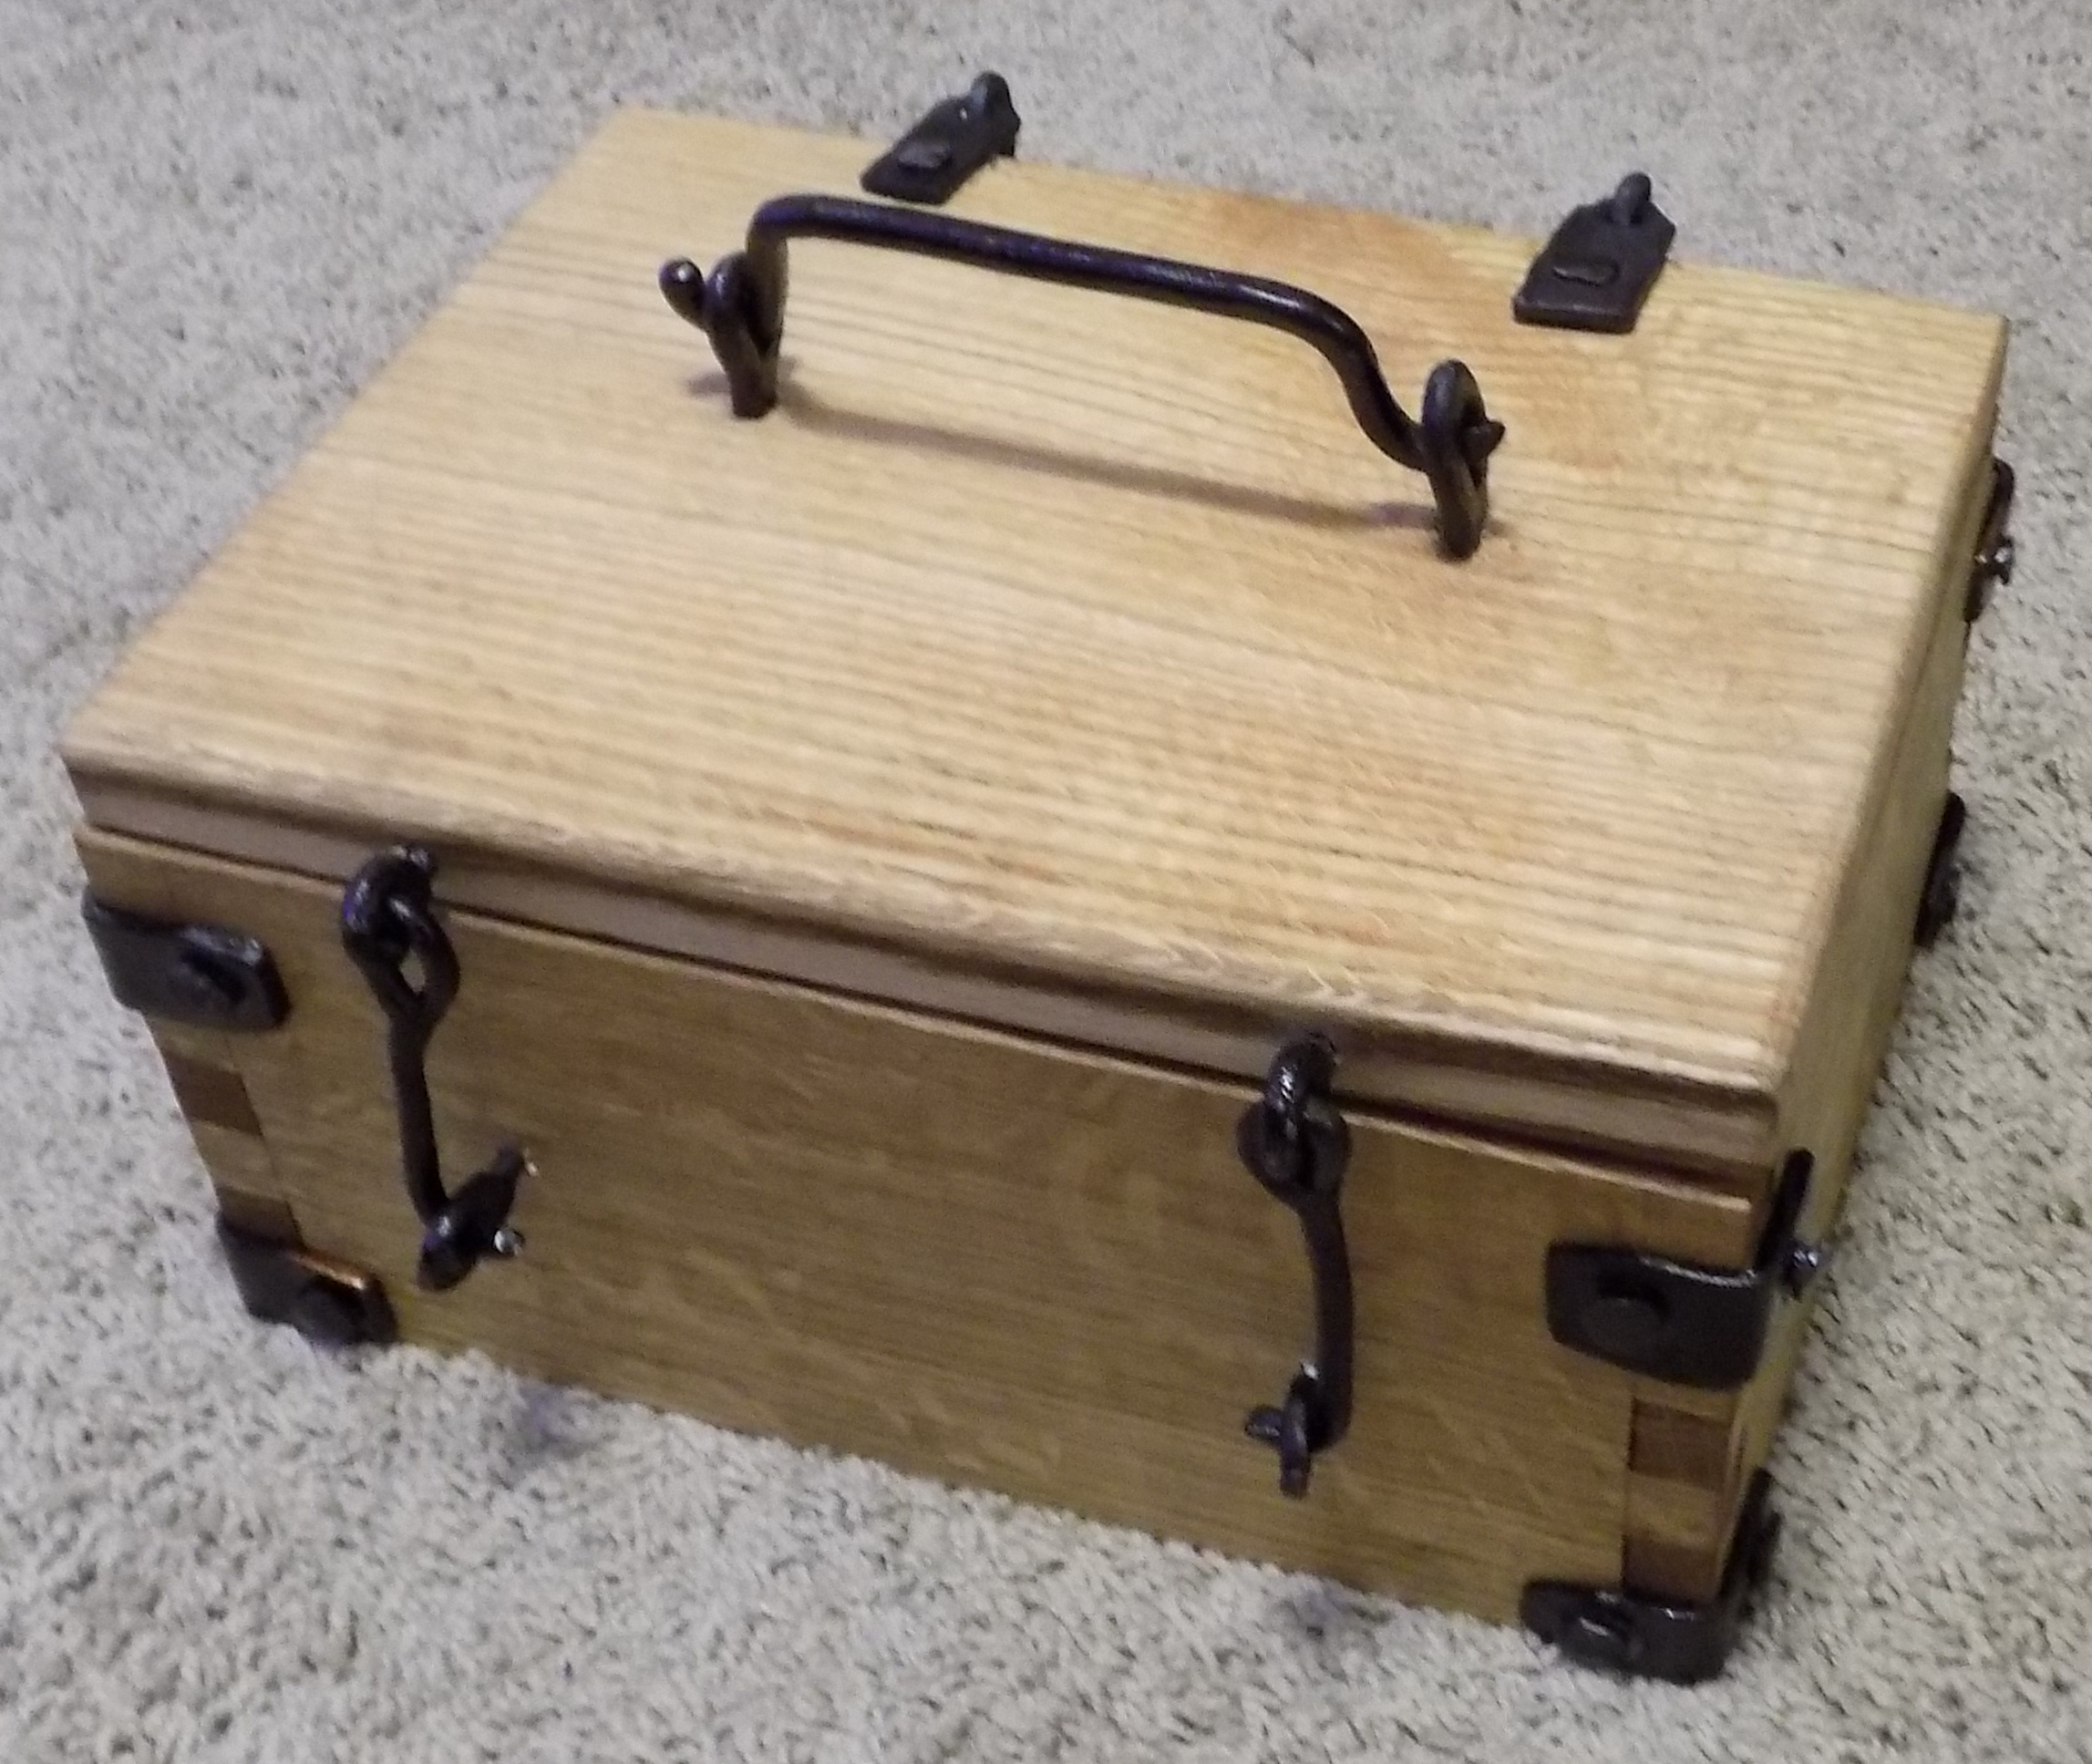
Front of the box. The clasps where a bit of a challenge to get to engage, but not be too tight or too loose.
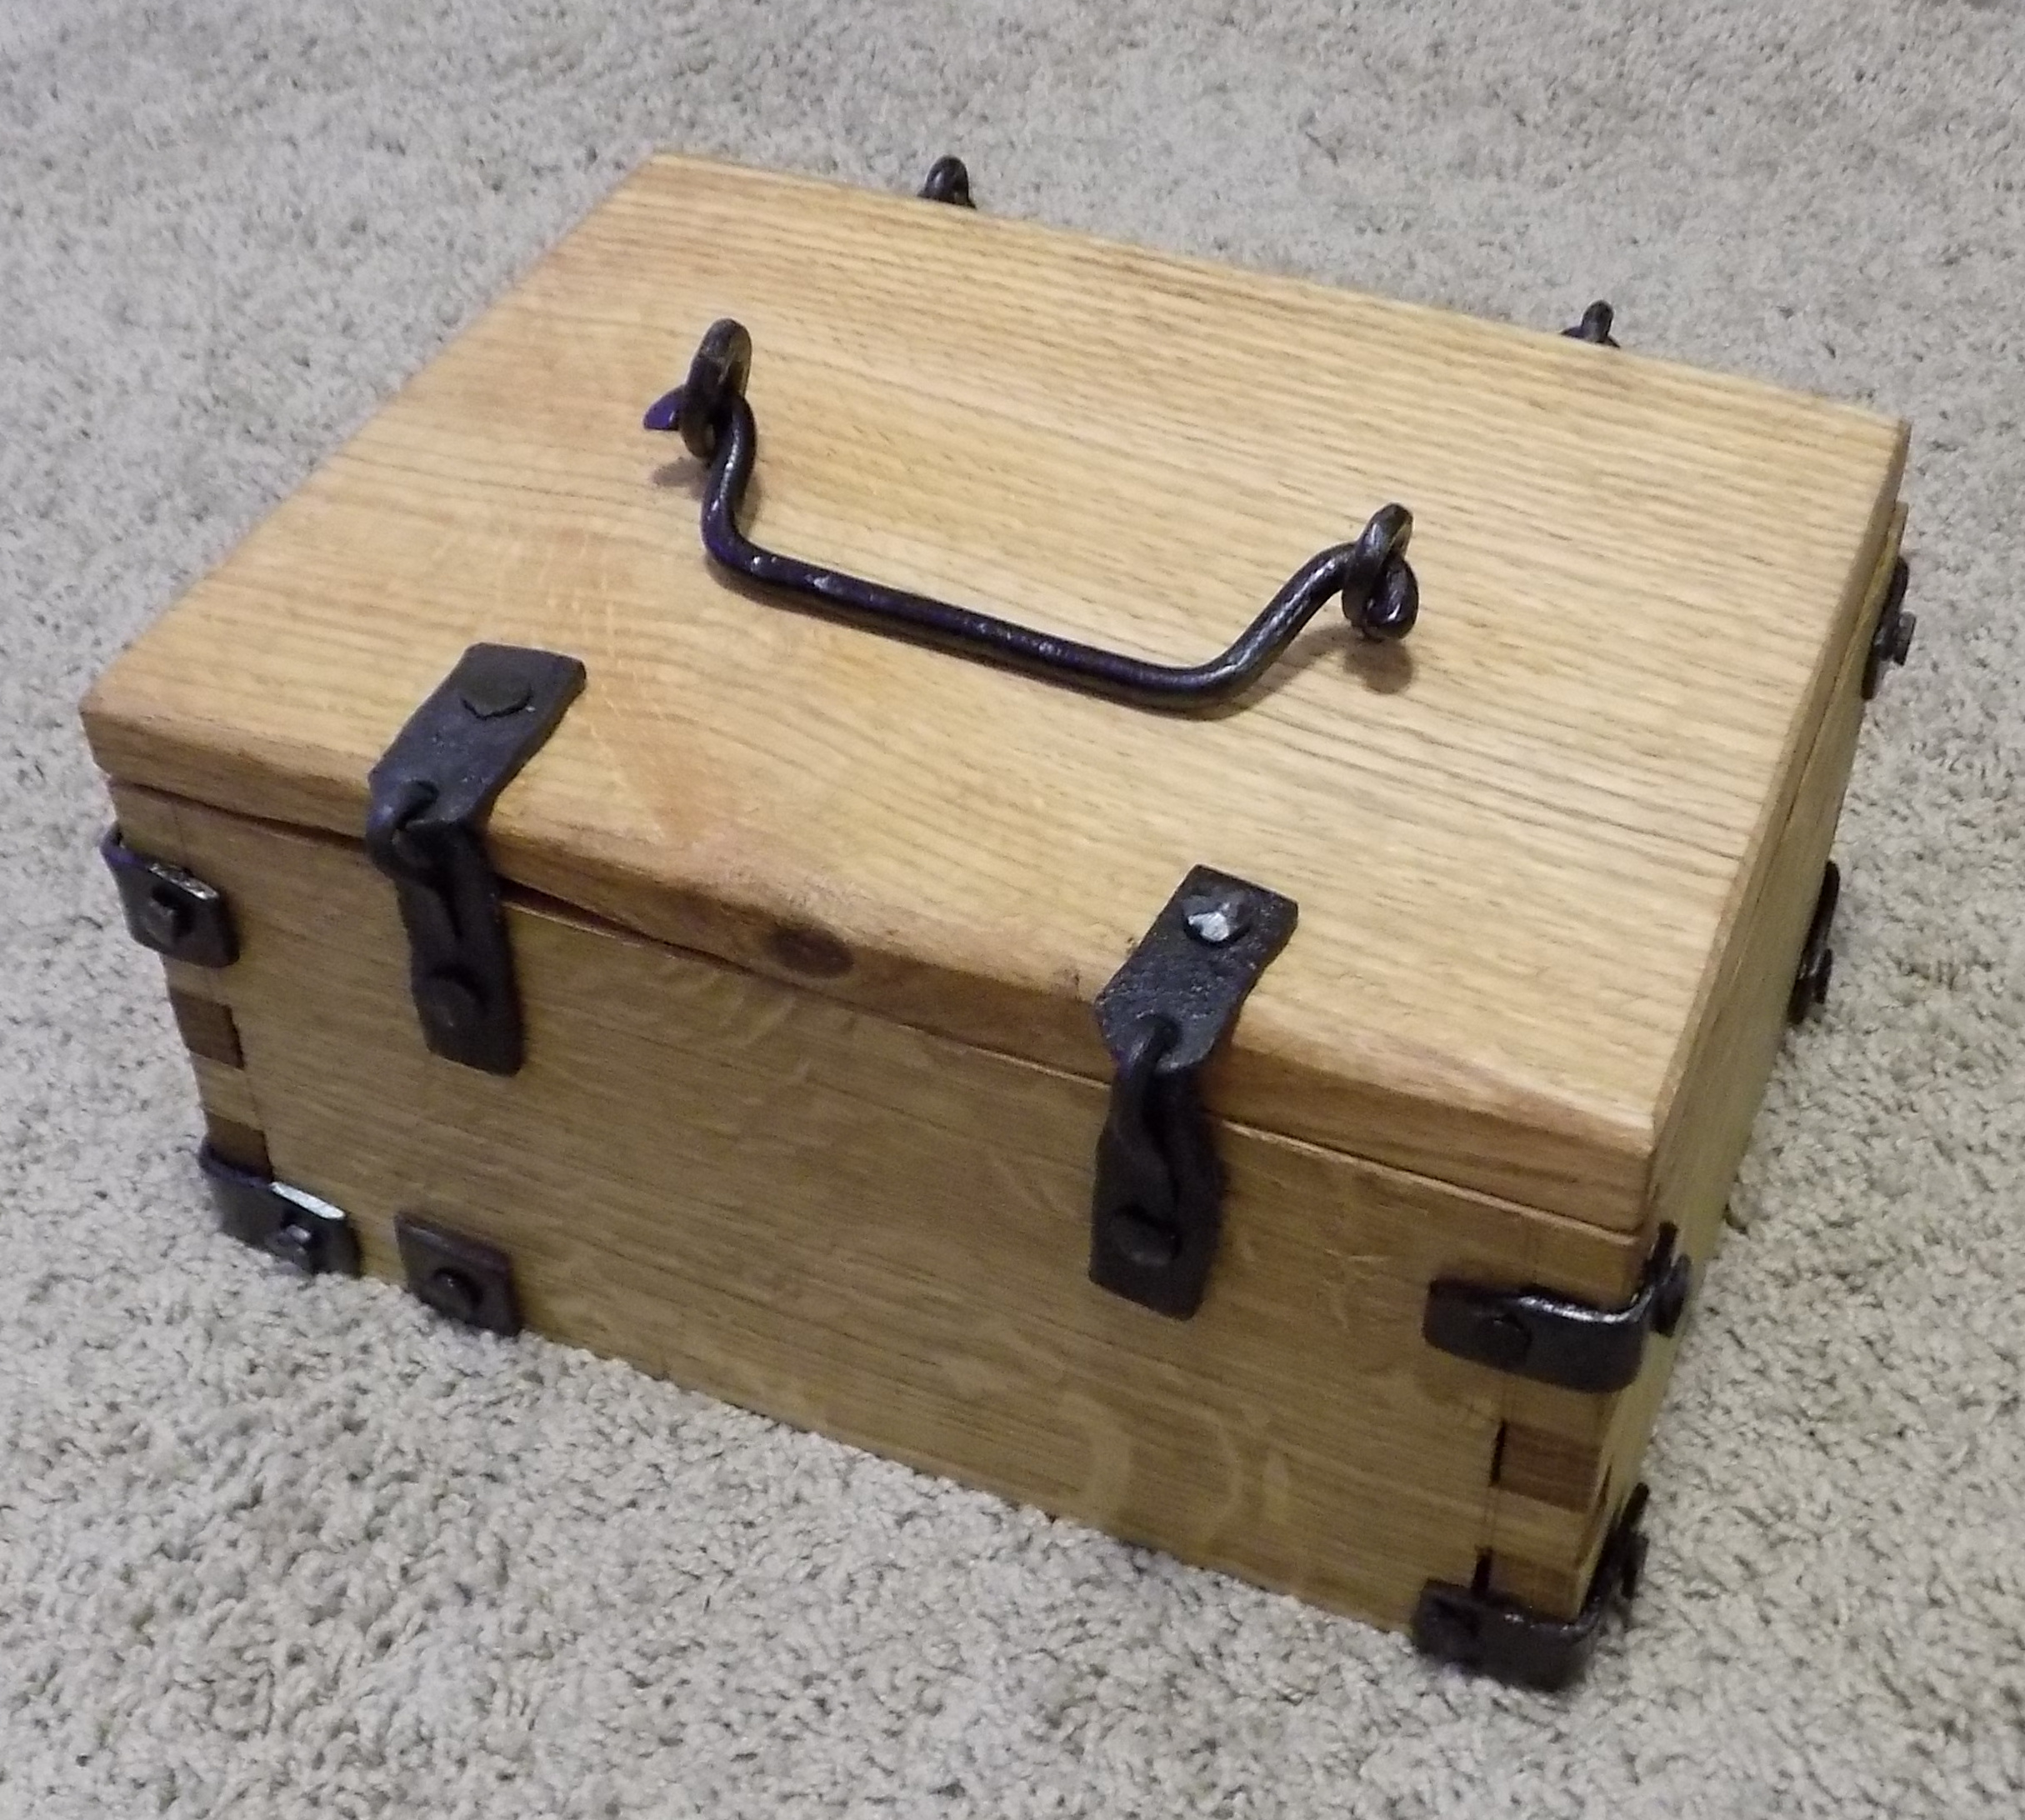
Back of the box. The strap hinges where made following the process from RowanTaylor on YouTube – https://youtu.be/AhaRh-cEOos
The extra square with the nail in it, is a repair, there was a flaw in the board where a bit of extra re-enforcement was needed.
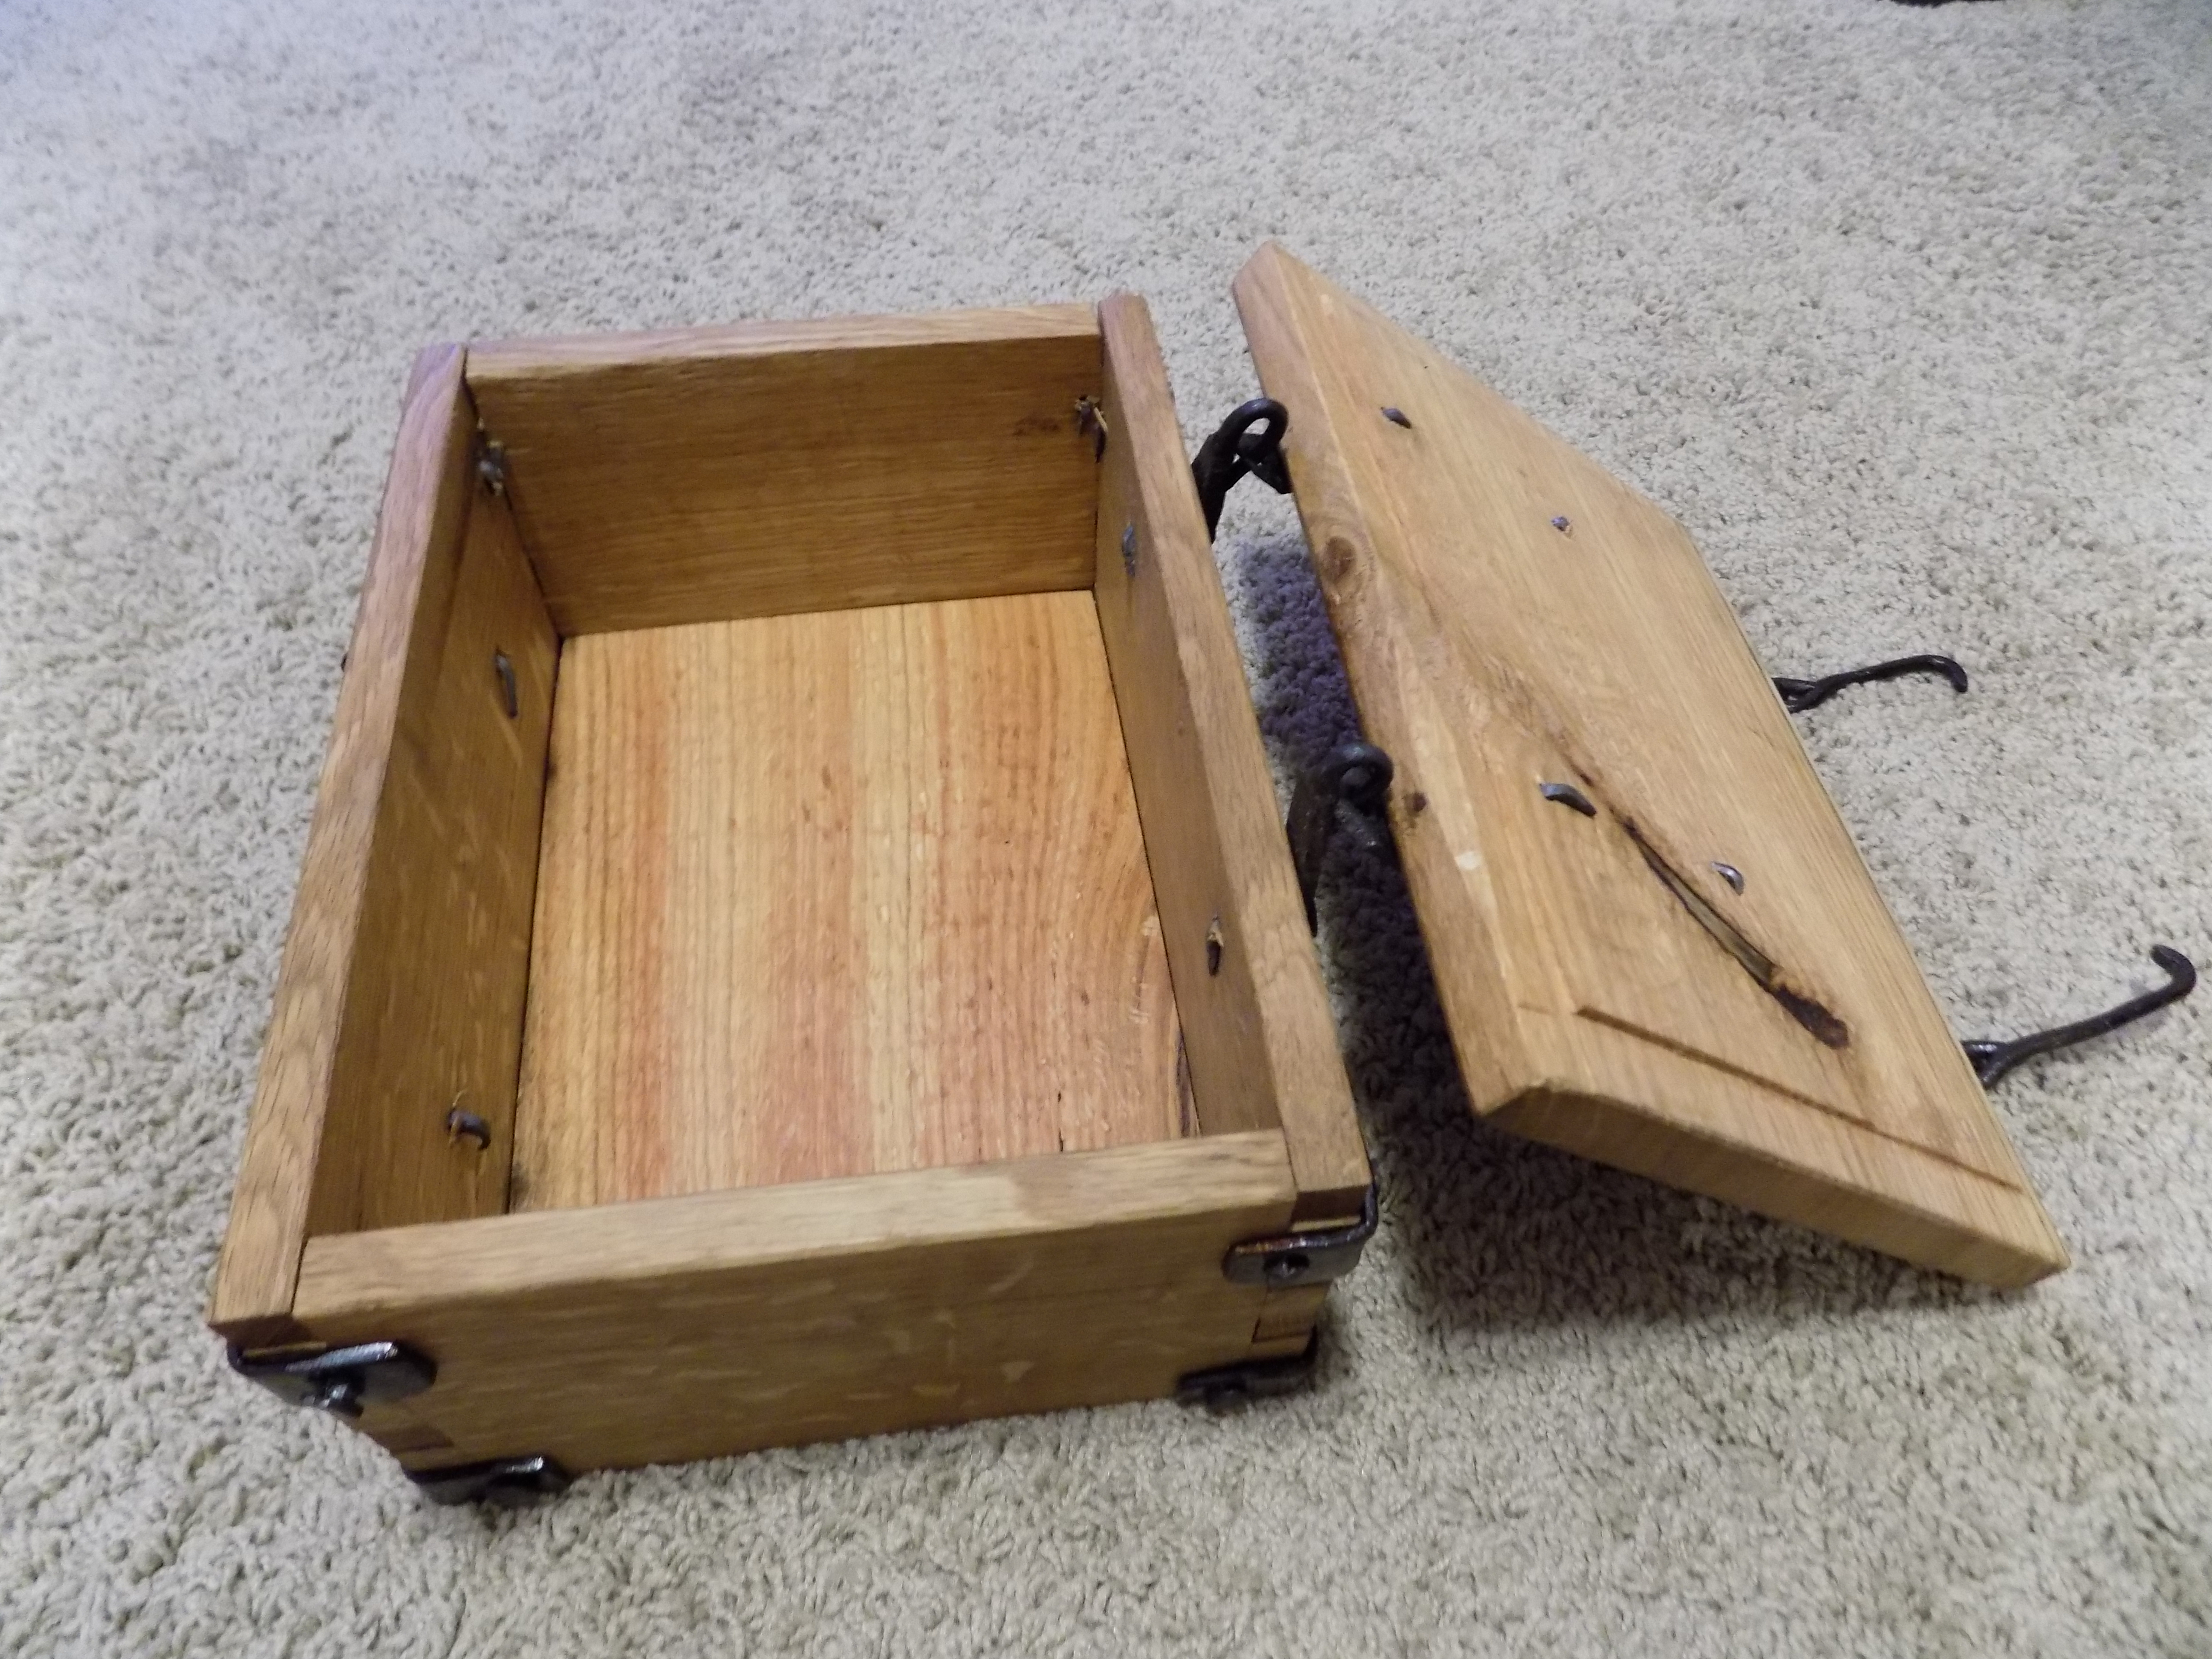
Inside the box, you can see the clenched nails, they are not smooth, but do not catch on anything as the tips are all in the wood.
Over all this was a fun project the only thing that I would change was not using a surface planer to do the thickness work, but time is time. For the record this was my first blacksmith project and I’m pleased with the results. In a couple of years I would like to revisit the project and try again with more skills on the metal working parts.
This picture was taken for a class that I teach on getting started with hand tools. These are all tools that I have made except for the dividers that I can document back to the end of the 15 hundreds.
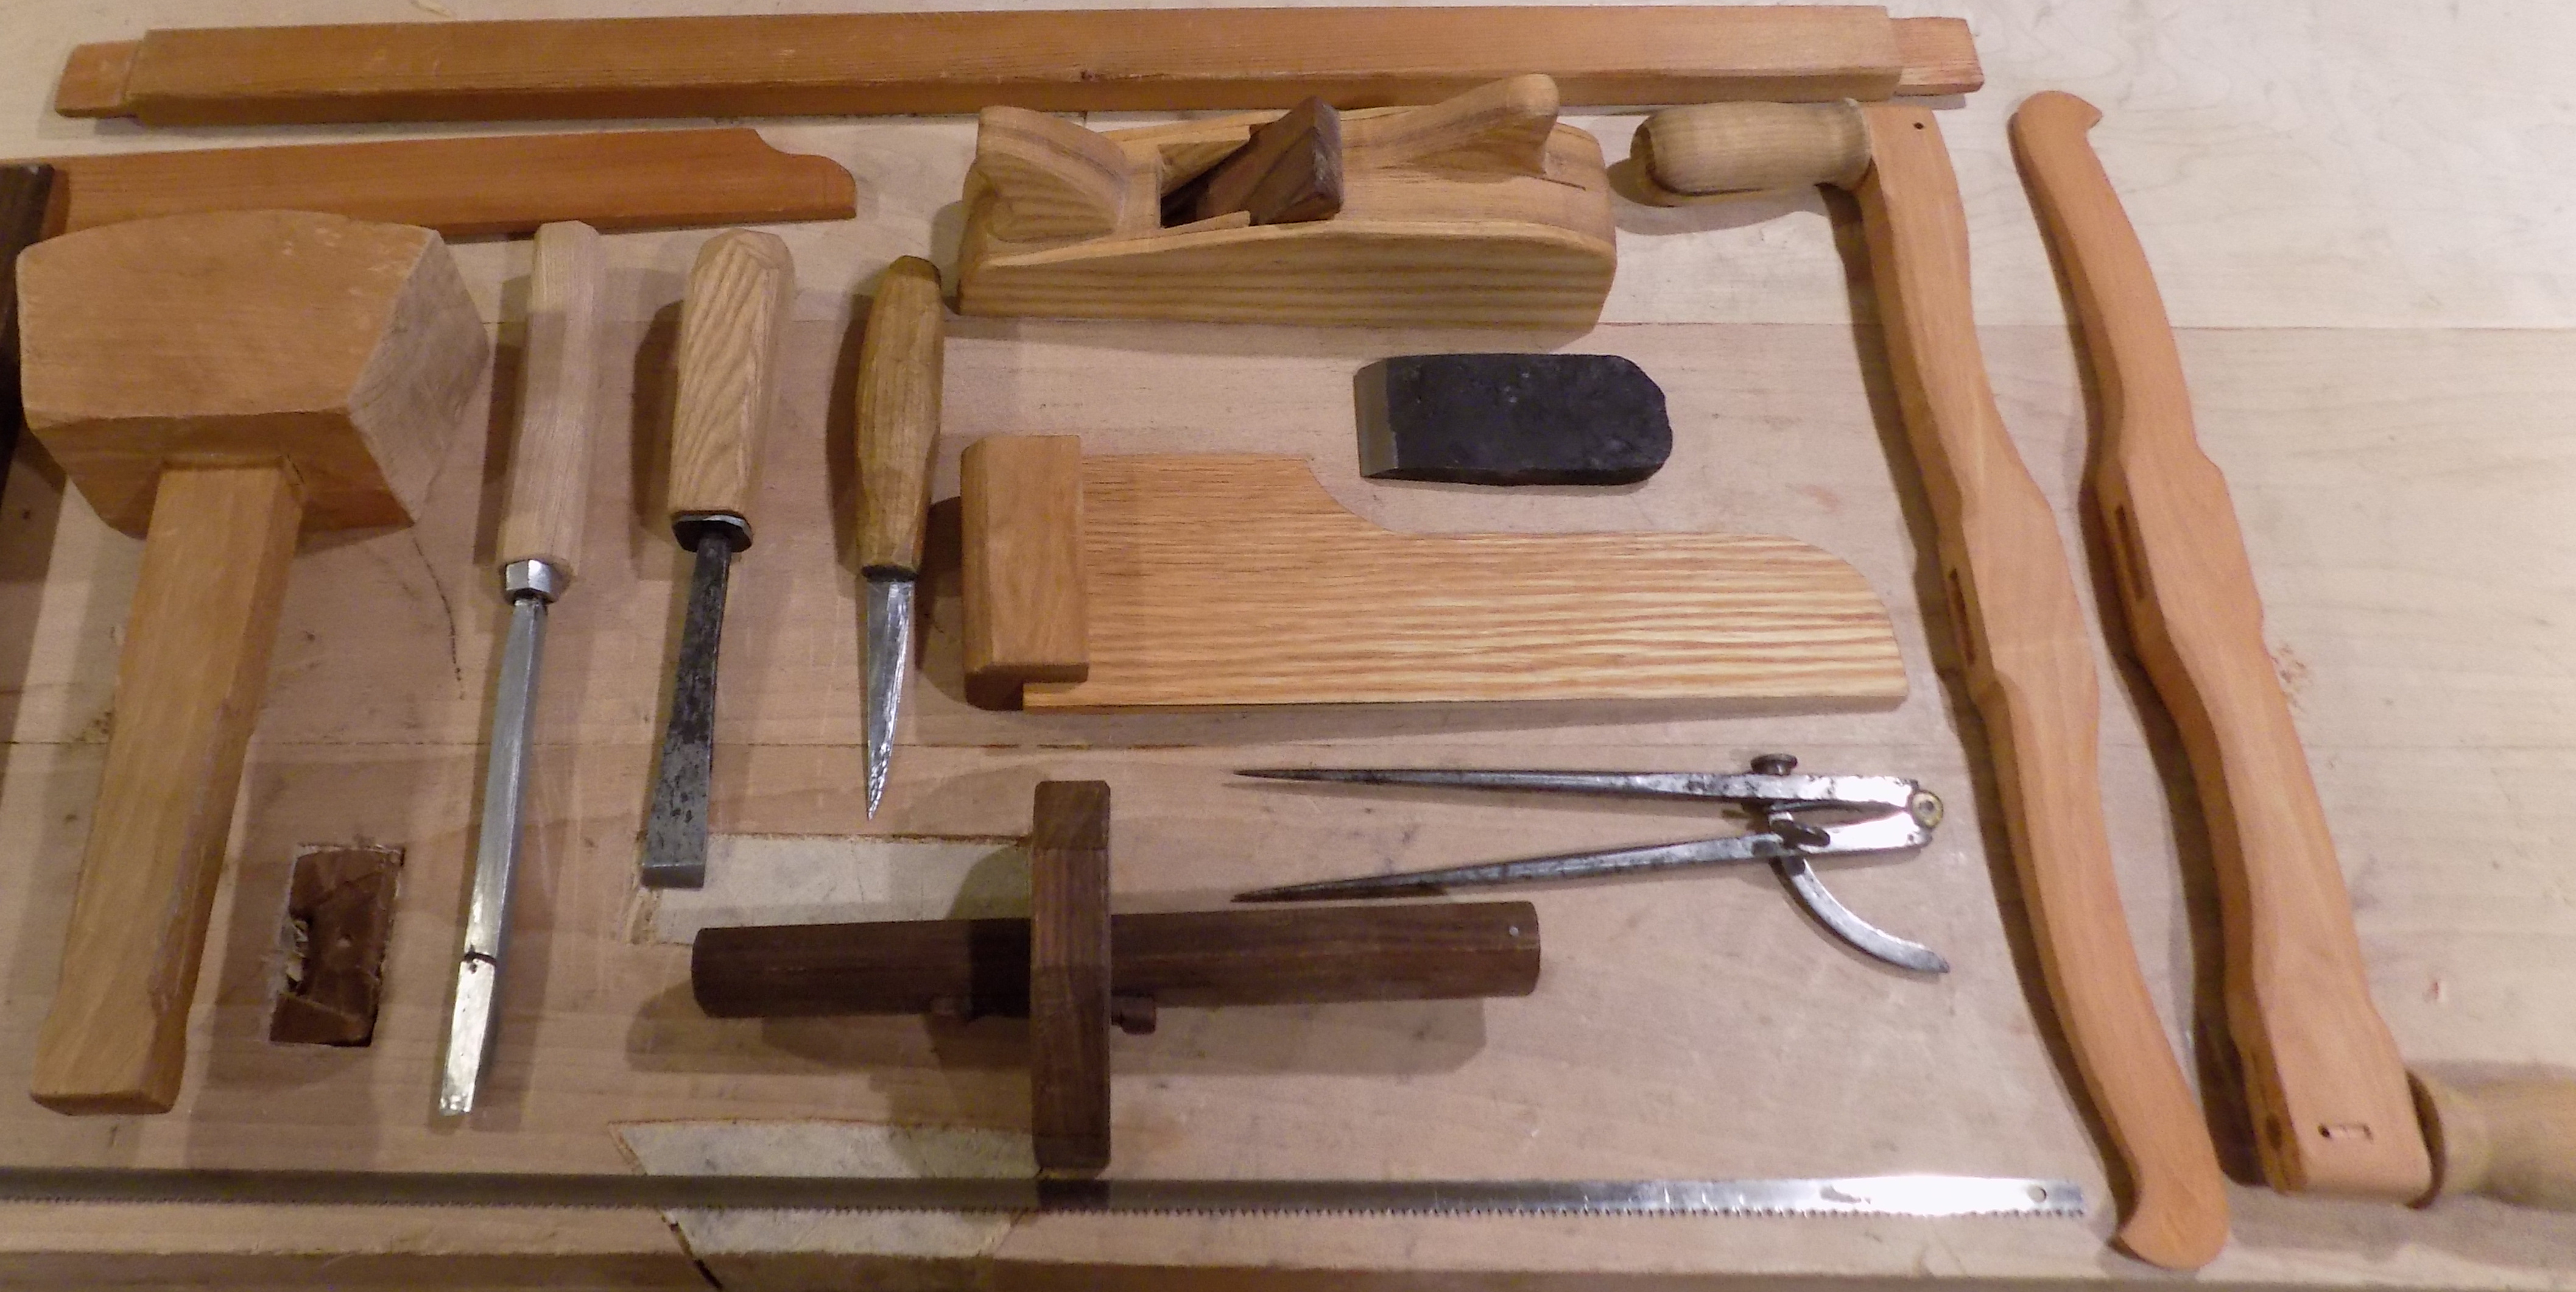
This will hopefully be the start of the process of updating my tools with more and more tools that I have made. My blacksmith skills are slowly improving so soon I’ll be able to make the wood and metal parts of the tools.
My working set of tools is better represented by:
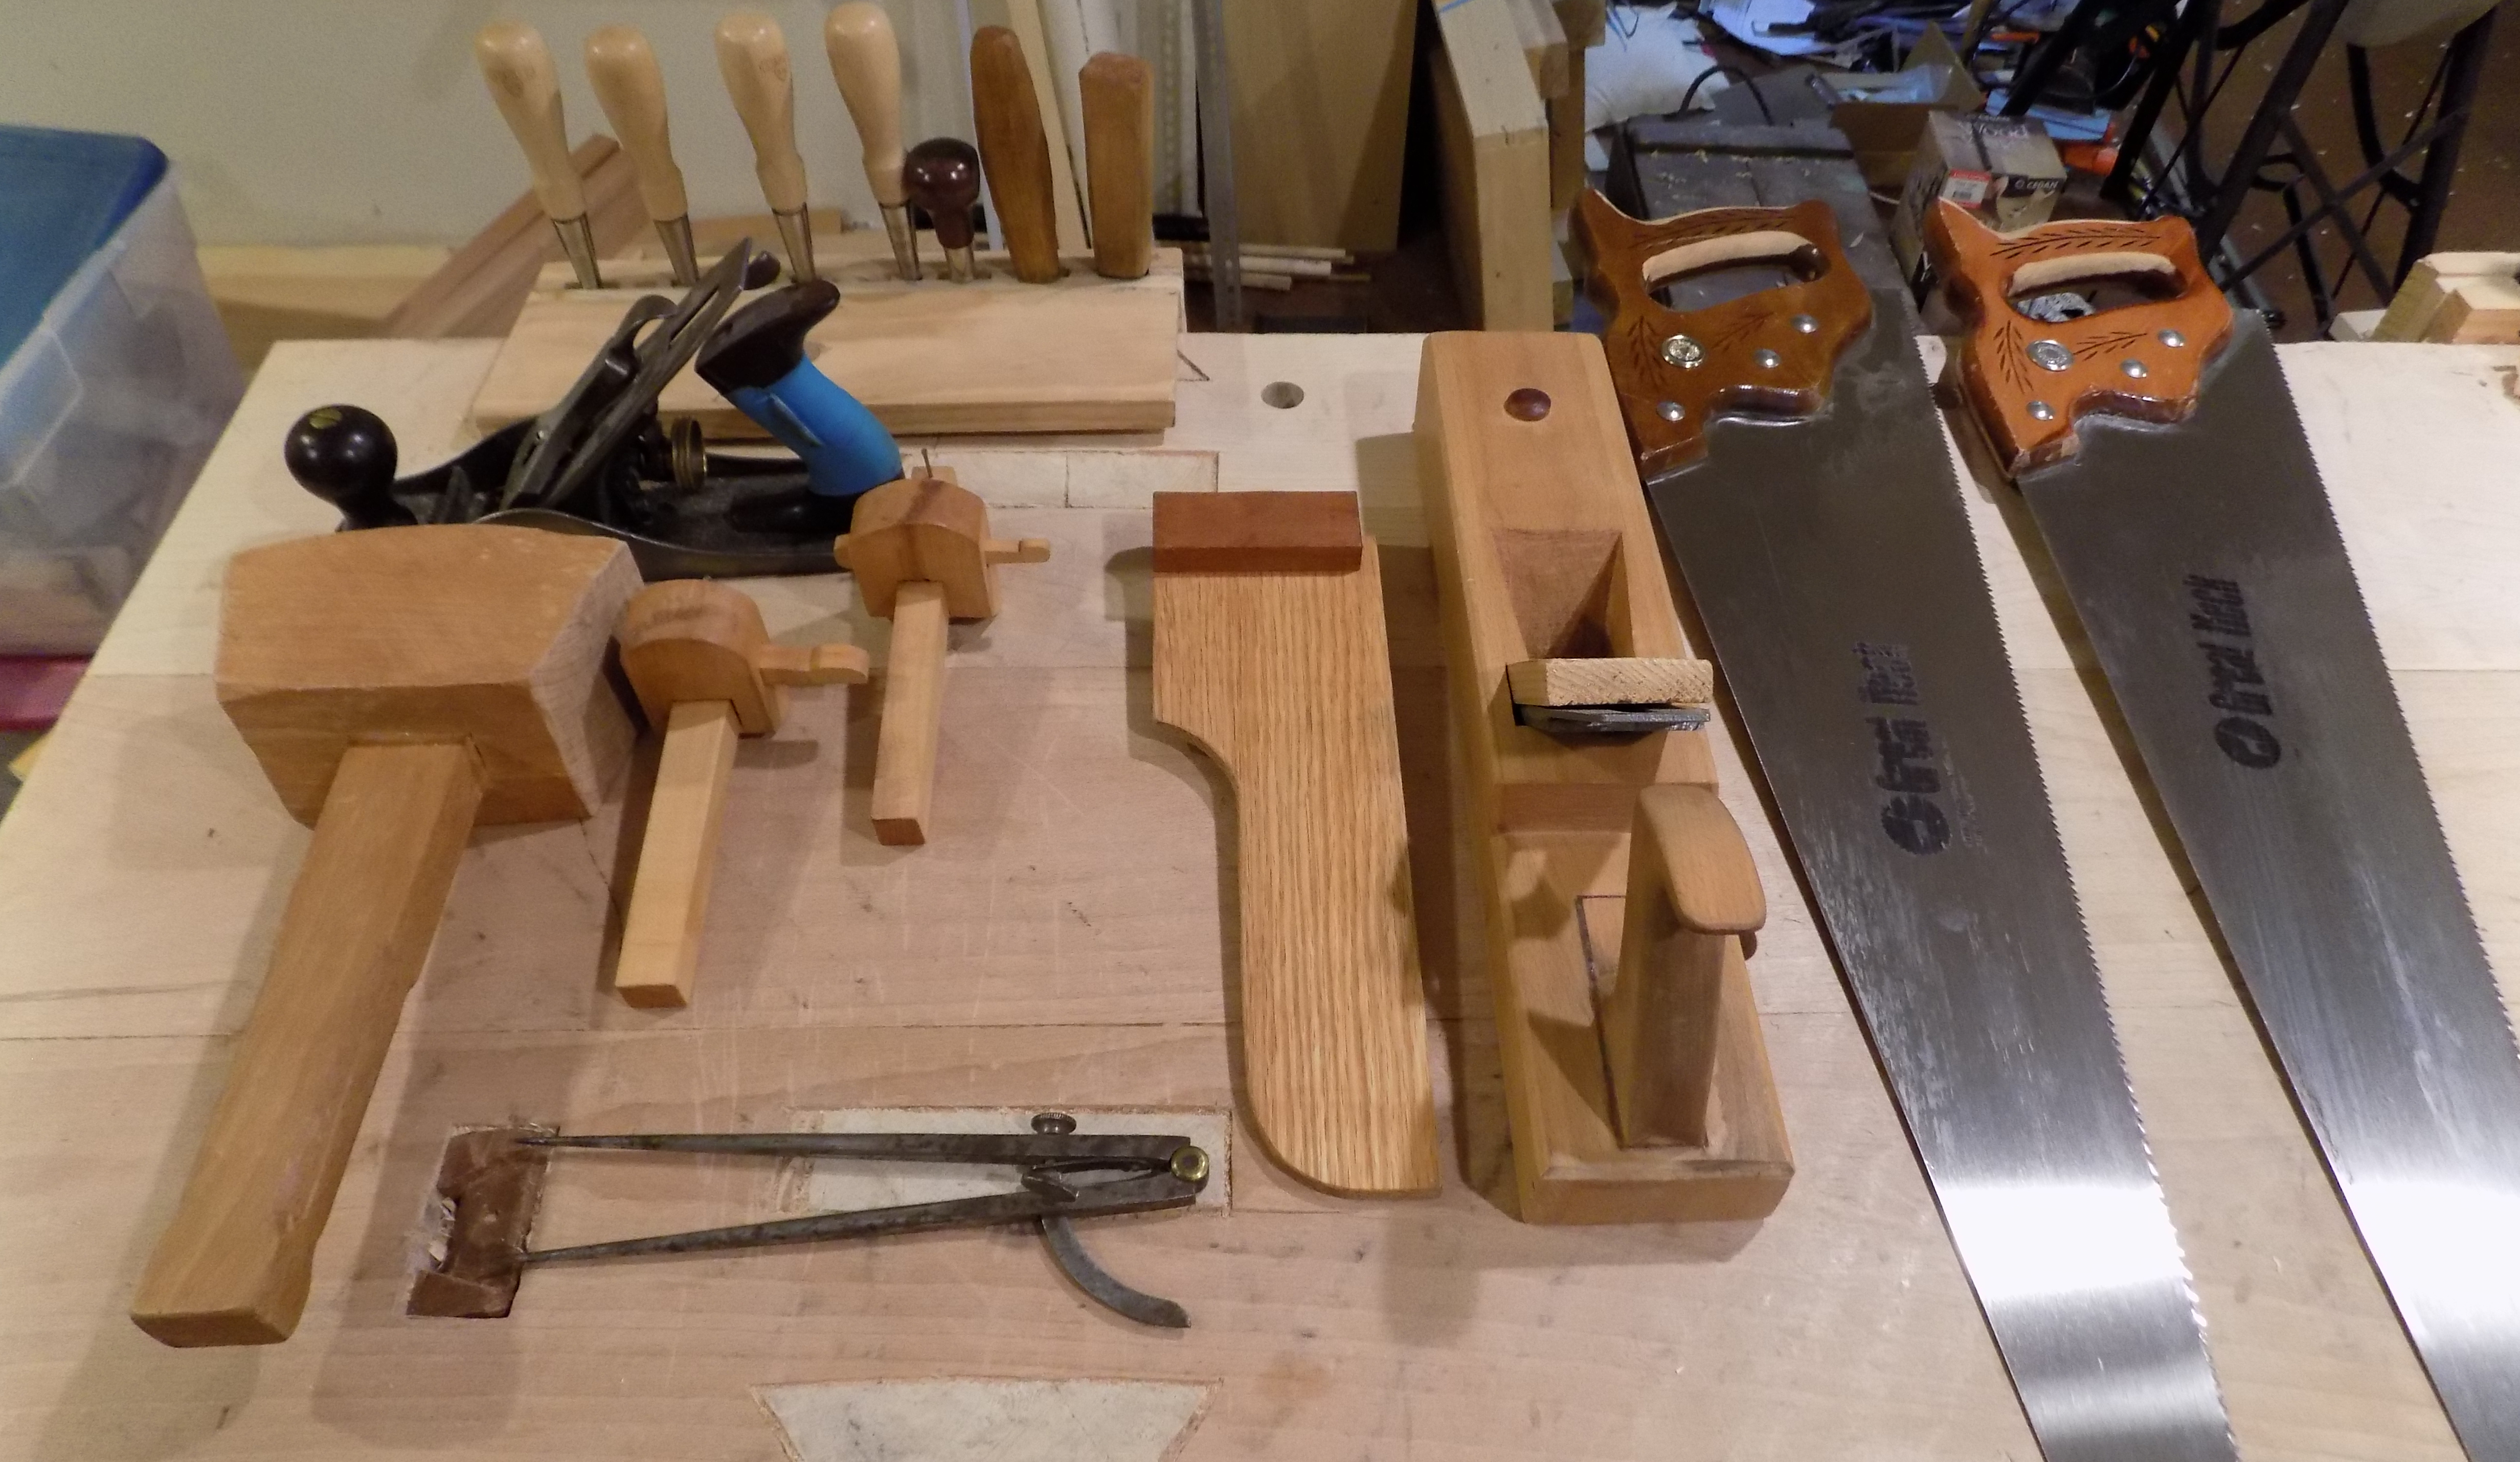
Differences:
- I prefer the panel saws to frame saws.
- The two planes, the Stanley #4 is for hard to work grain.
- The wooden plane is my daily user, a “jack” plan that was my first laminated plane.
- The marking gauges are a newer French design.
- The Stanley Sweetheart chisels are what I’m used to, the newly forged reproductions will take some getting used to.
Over time I would like to improve on theses with more examples that I can document or tools that I have made myself.
For a long time I have wanted to make a brass backed tennon saw. There is a video series on Popular Woodworking’s Video service that details the whole process from start to finish. I got the blade blank 4″ x 14″ x 0.025″ thick with 14 teeth per inch from: http://www.tgiag.com/ (Two Guys In A Garage Tool Works) maybe 5 years ago or so.
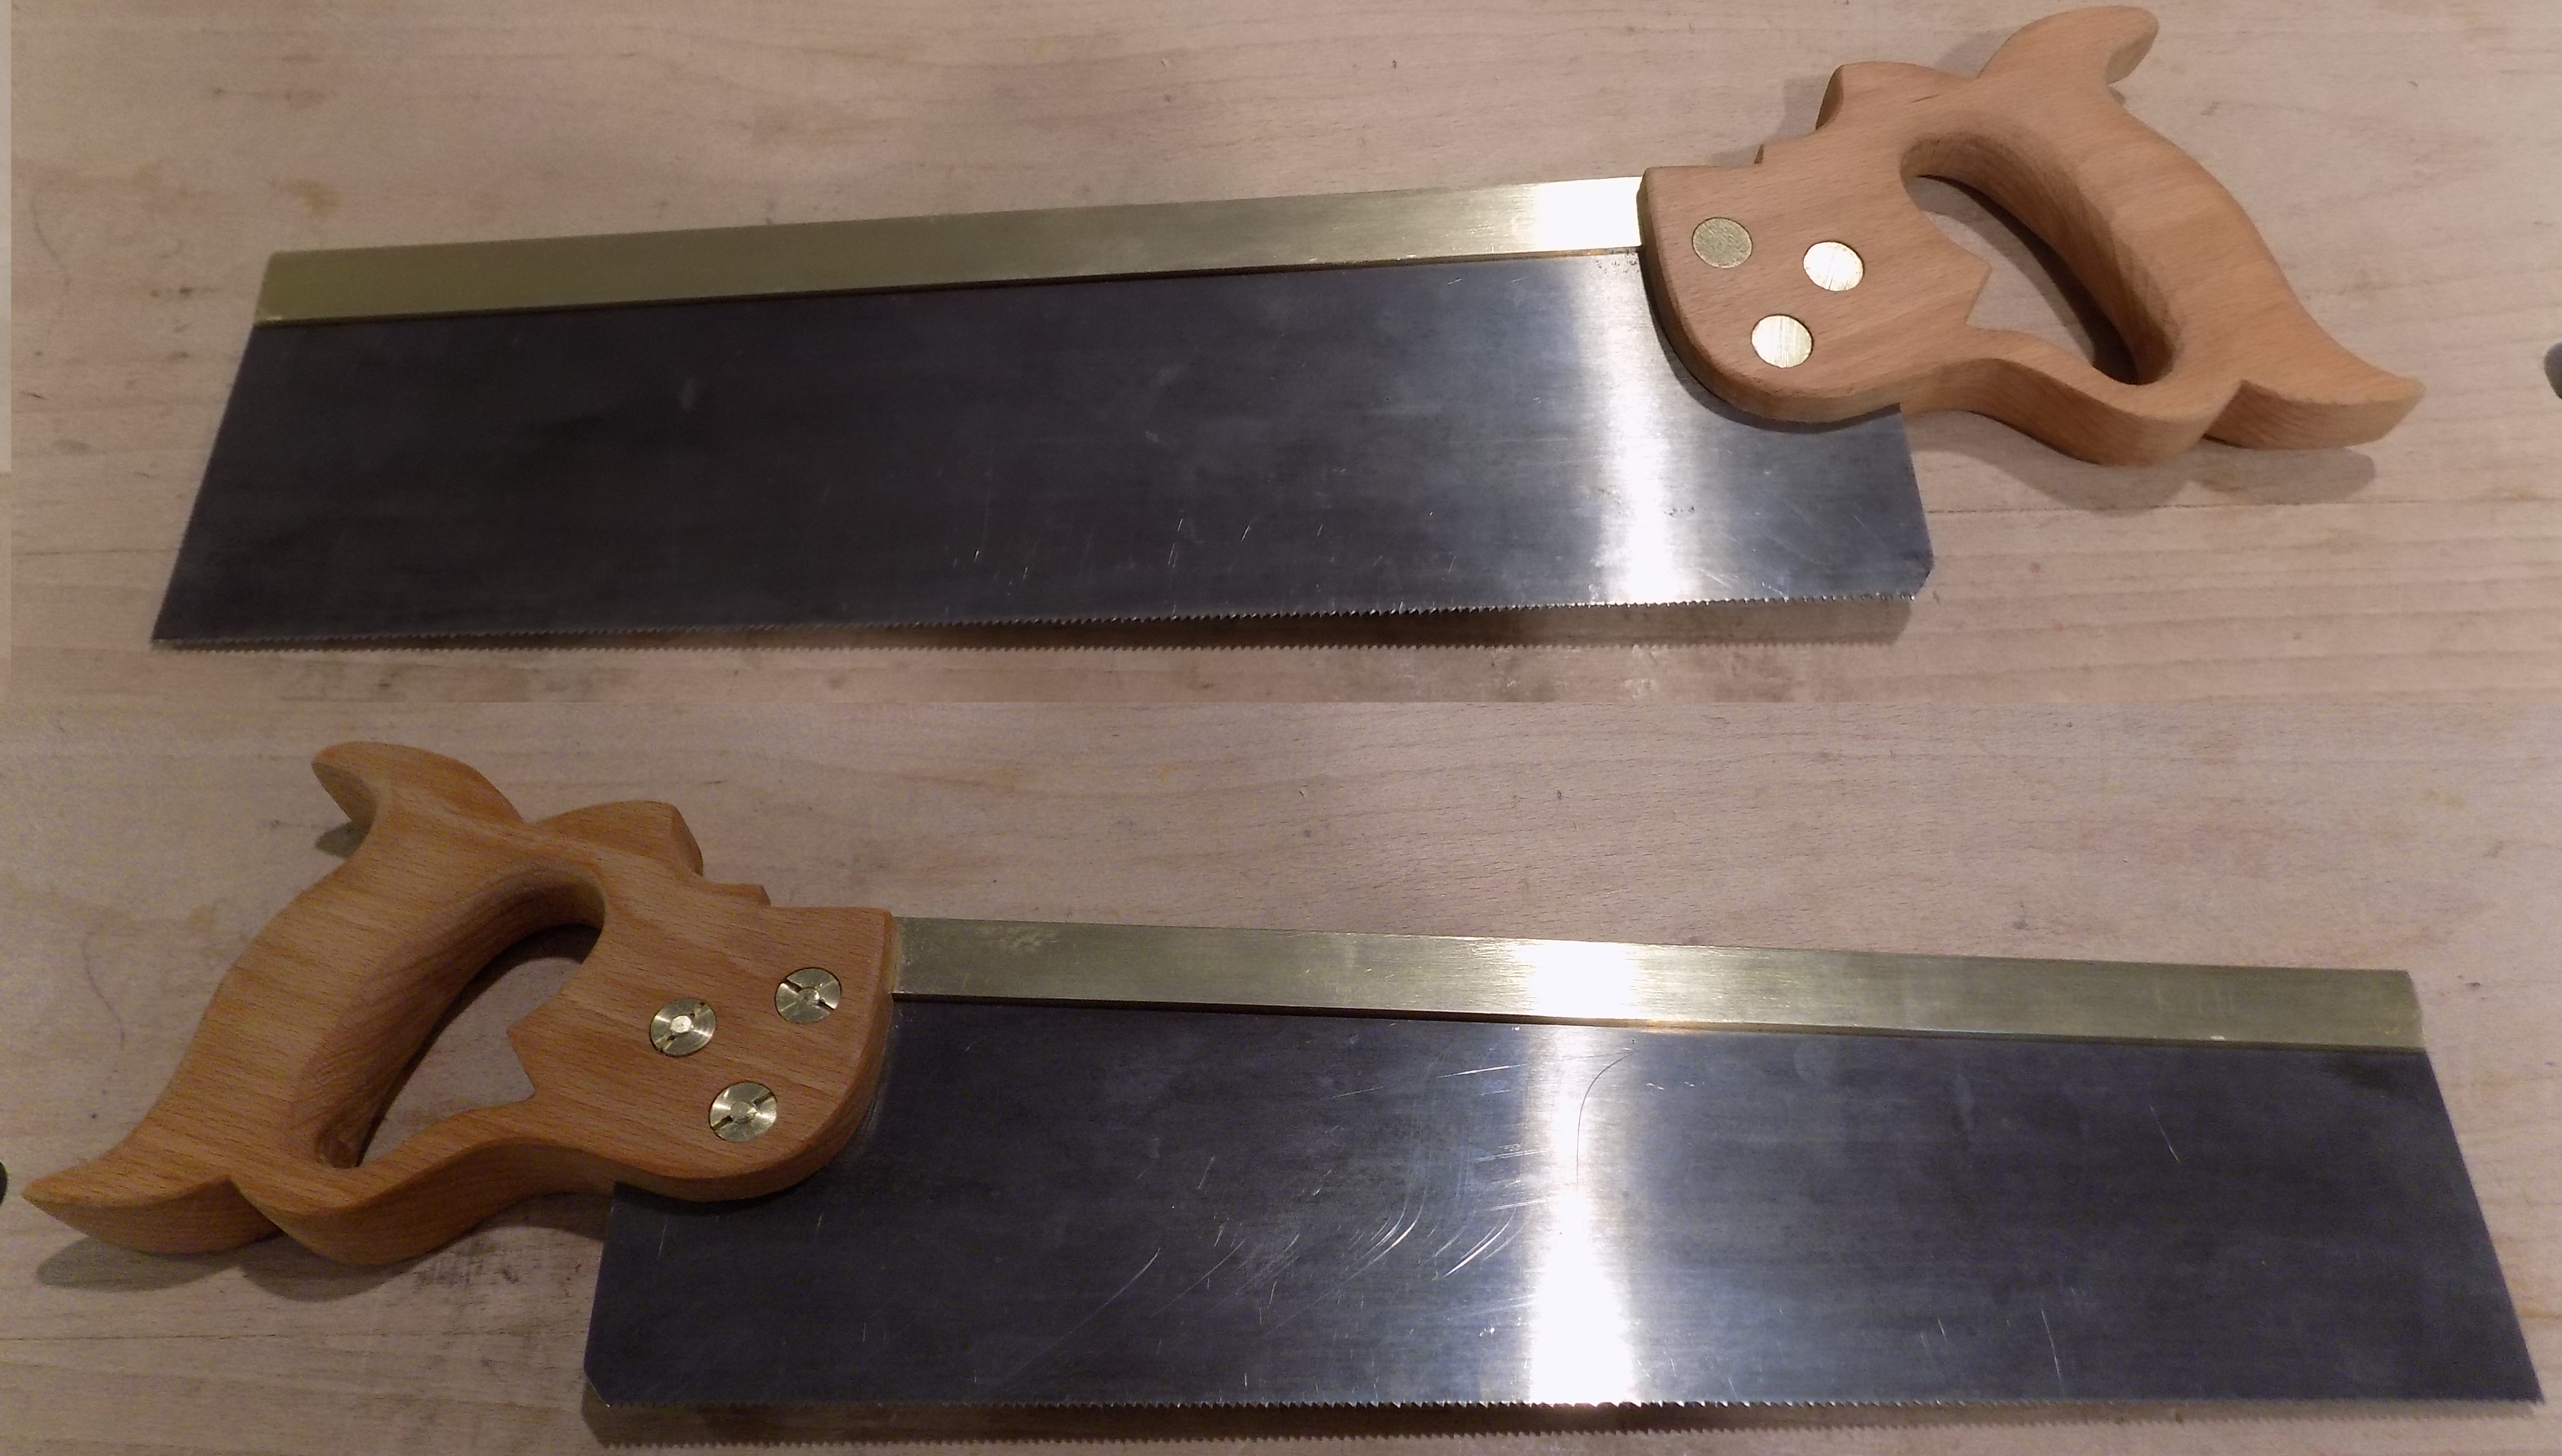
Then the project sat for a while till I get a turning saw complete as, I do not own a band saw and using a coping saw on 1″ beech did not seem like much fun. This winter the turning saw was completed then over the week between Christmas and New Years I completed the saw.
The brass back is a 1/4″ by 3/4″ with a slot that I milled into it with a slitting saw on my Harbor Fright mini-mill. With clamping and supports I could get about 4″ at a time for the 14″ that where needed.
The brass saw nuts where made on the lathe and then the mill.
The handle was worked by hand with the turning saw and a rasp. One tool that makes the process much easier is a “Handle Makers Rasp” from Gramercy:
https://www.toolsforworkingwood.com/store/dept/TRR/item/GT-SHRASP.XX
The bent tip is designed perfectly for working the inside of the handle, it is hard to describe how perfect the shape is. I thought that would be a laborious and time consuming, turned out to go pretty quick.
Sharpening the saw took a bit of patience, and a lot of little dots with a Sharpy marker to make sure that I was working on the right teeth. Just do it, do not over think it.
Things that I would do differently:
- Get a folded brass back from the same guys that made the saw plate. Milling the slot was a fun challenge on my machine as that is on the upper end of the size that I can work with on the table. Does not do anything to make the final project better.
- Buy a set of saw nuts. Again like the milled slot it is good to use my machining skills, but it does not add much to the final project.
- Have less teeth per inch, maybe 10 or 11, the 14 is pretty fine. I also put a very fine set on the saw, likely that I will correct that when I sharpen it next time.
I’m glad that I put some cant on the saw plate to experiment, makes the saw look a little odd, but it seems to make it a little easier to work with. That will take time to get fully used to.
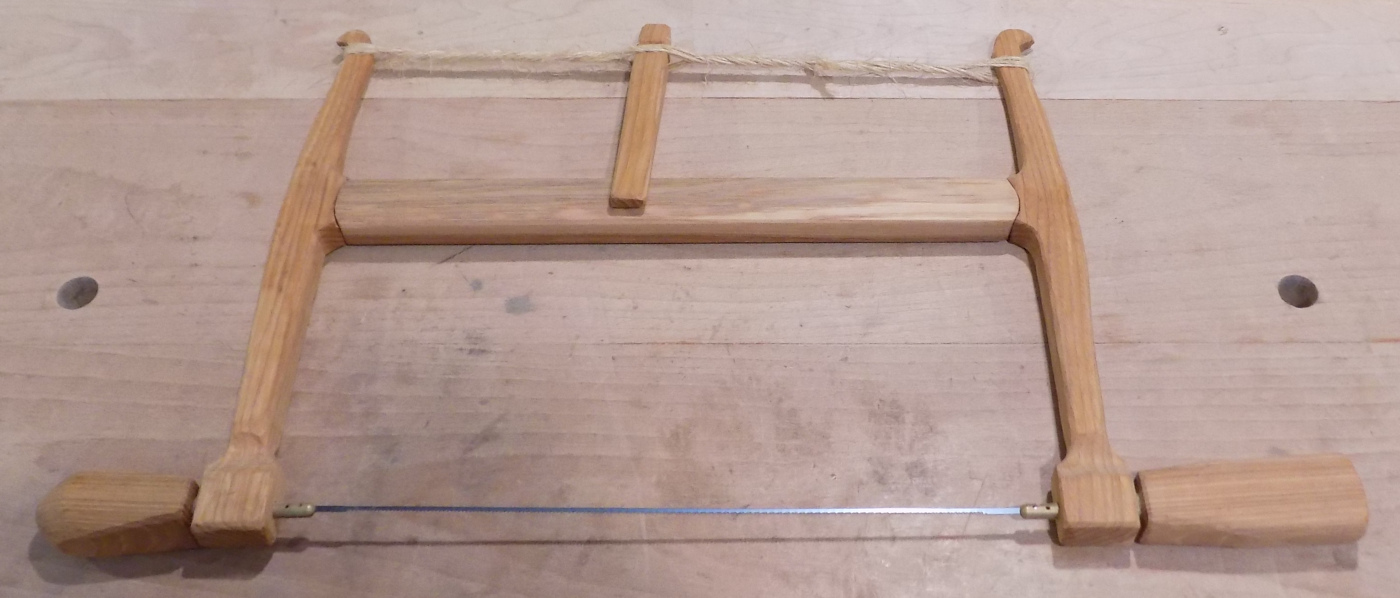
A Gramercy Turning saw. From them I got the small brass pegs and a set of blades and roughly followed the drawings. Everything was worked by hand. The reason for completing this project was so that I could make a brass backed saw. With a turning saw I could cut out the curves of a handle. Parts for the saw came from:
https://www.toolsforworkingwood.com/store/item/GT-BOWSAW12
The wood frame is hickory from Mendards 1×2 by three foot sections, the handles are part of an old sledge hammer handle. The project was finished with linseed oil.
Cuts well, when under tension the blade strongly resists twisting. Two things I would do differently:
- The cool looking curved mortise for the center beam was challenging to get lined up square and solid under tension. Took a bit of tightening, looking for a twist, then taking apart, rasping/chisel/knife work till everything seated properly. I would make that a square mortise, just leave a little wiggle room on the tennon.
- The toggle at the top. There is a ridge to keep everything in place, so to tighten you need to go one full turn. With a straight beam you would be able to tighten in half circle increments.
My handles are not turned they are octagonal. Still on the fence if I like that or not.


Last summer I had to have three white pines taken down in my back yard. The first two trunks got turned into the Pine Stools, leaving one trunk about sixteen feet long. Being white pine, there are a ton of knots, the bane of the hand tool wood worker. So instead of chopping it up into firewood, I bribed a friend of mine– who likes Greek food and has a chainsaw– into cutting the trunk into slabs for me. We had tried to cut slabs earlier from a smaller section of trunk using a normal (crosscut) chainsaw blade; we eventually got it done, but it was very slow. This time I got a ripping chainsaw blade and the process went much better. The blades don’t look that different, but the cutting geometry is different in the same way a rip saw differs from a cross cut saw. Using a 2×4 as a guide, the cuts were all from the top down by eye; it’s not as accurate as a mill, but for nothing but the cost of a 2×4 and some nails. The results definitely exceeded my expectations.
The tree trunk’s shape necessitated working it three sections. The first section of trunk nearest to the ground made two very nice slabs, between three and four inches thick, by twelve or so wide, and roughly three and a half feet long. The next section was about seven feet long; we got one nice slab out of that, which I cut into two more bench tops. There was a more-or-less half round piece that we could not figure out how to hold still, so we left it that shape. The top-most section of trunk was about six feet long, but not wide enough to get more than one slab out of. So we decided to split it down the middle for two additional half rounds.
Normally, at this point in the project I would switch over to hand tools. The intended purpose of these particular benches is to be used at an outdoor SCA event for crowd seating, and the event date isn’t that far off, so I resorted to using power tools to speed up the process. The legs are 2x4s run through the power planer to get them flat, smooth and all the same dimensions. If I had unlimited time they should have been turned to better match the historical examples, which in turn would have made the mortising process easier.
I brought each rough sawn slab down to my main workbench to get the top surface prepared. This process was done by hand for two reasons: First, my planer could not handle something that large; and second, they get a better surface texture when done by hand. Using a strongly chambered iron and diagonal cross-grain planing I was able to remove the saw marks on the top pretty quick; the bottoms, other than sharp corners, were left rough.
For the flat slab benches (not round on the bottom) I mortised roughly two and a half or three inch deep at a 1:6 angle. I drilled out most of the waste first, using a timber framing trick; normally I would do that by hand, but to save my arm I did it with a one and three-eighths Forstner bit and a power hand drill. I did the final sizing with a corner chisel and bench chisel, which is fairly straightforward work in the soft green pine. Add the four legs, trim them off level, and the bench is complete.
Two of the sections with rounded bottoms were a bit more challenging to get that top surface flat, but eventually they got there. I eyeballed the placement of the legs; they are a more of a bold angle because there was less log to mortise into.
The last rounded bottom piece was a little smaller and thinner, so I decided to put in three legs for a change of pace. While it looks like it would be tippy, it is not: Three points define a plane.
All of the benches are finished with satin marine polyurethane as they are expected to be used outdoors and left to the merciless elements in between uses. There is a surprising amount of surface area to cover, one and a half quarts worth.
I’m going to keep my favorite for use in my backyard.

On Lost Art Press’s blog there was a wonderful picture of a Renaissance woodworker– but that did not catch my eye, the lady working on the lace pillow did. The original image comes from the Rijksmuseum, Amsterdam, Netherlands.

http://hdl.handle.net/10934/RM0001.COLLECT.169429
I set about to make one and here is the results.


Front (left), side (right).
The wood used on the sides and front are green oak; the top is pine. The under side is open; the sides rest directly on the lacemaker’s legs, as shown. The dimensions were made to roughly match the size relative to the original image. The pictures don’t show it very well but the top is a trapezoid, with the front a narrower than the back so that the bobbins can be fanned out as the lace is worked. I changed the carved design to a simple bullet pattern because the samples I made, trying to learn the pattern in the inspiration image, just didn’t look right.
I got help with the upholstery from my lovely wife. She sewed up a shaped “bag” that is packed with sawdust and tacked to the wooden top, covered with batting, and finally with velvet for the lace pins to stick into.
The project was a success. The joinery on the angled sides was difficult; I think those joints could use a little improvement. I wanted to not have end grain showing on the front, so I had to figure out a complex rabbited joint. The top is nailed on to the sides and front, which provides more rigidity than the pegged corners alone.
